A Comprehensive Guide to Taking Screenshots on Windows
In today's digital age, the ability to take screenshots on Windows is an essential skill for anyone using a computer. For starters, screenshots can be incredibly useful for a variety of purposes, such as capturing important information, sharing what you see on your screen with others, troubleshooting technical issues, or simply saving visual content for later reference. Therefore, whether you're a student, professional, or casual user, knowing how to take screenshots efficiently can greatly enhance your productivity and communication.
Specifically, this comprehensive guide will walk you through the various methods of taking screenshots on different versions of Windows, including Windows 10, Windows 11, and older versions like Windows 7 and 8. Furthermore, we'll explore how to capture the entire screen, a specific window, or a limited area, ensuring that you can find the perfect method for your needs. Consequently, by the end of this guide, you'll have a clear understanding of how to utilize these tools effectively, making your screenshot-taking process seamless and straightforward.
II. Taking Screenshots on Windows 10 and 11
A. Entire Screen Capture
1. Using the Print Screen (PrtScn) Key
Pressing PrtScn to Capture the Entire Screen
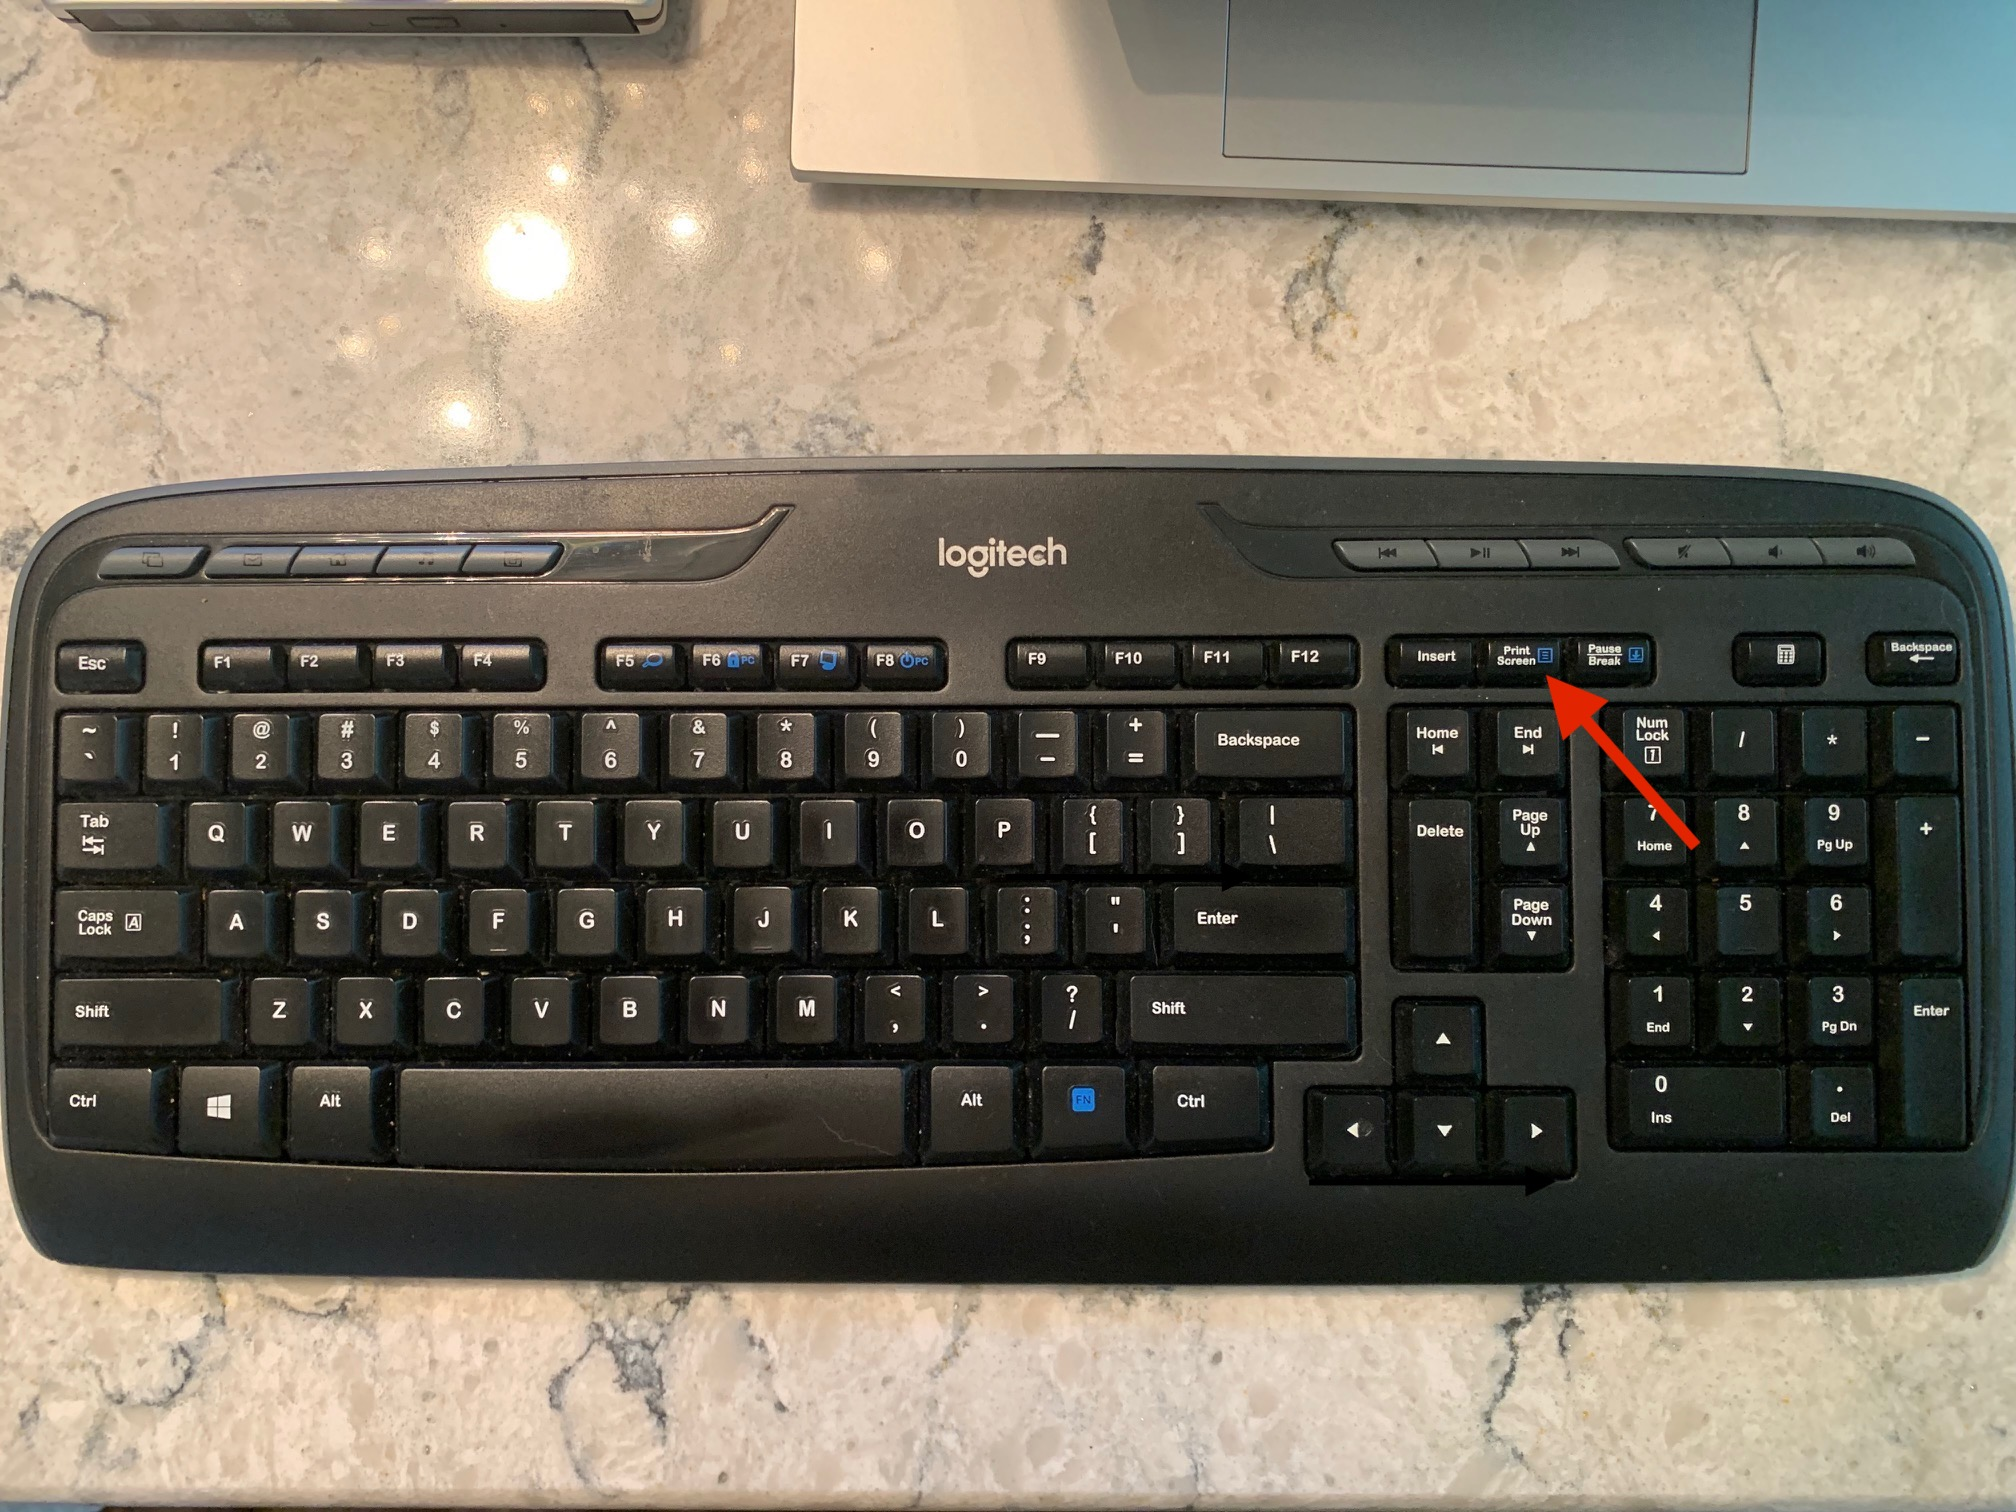
To begin with, the simplest way to capture your entire screen is by pressing the Print Screen (PrtScn) key on your keyboard. This key is usually located in the upper right section of the keyboard, near the function keys. When you press the PrtScn key, it captures the entire screen and copies it to your clipboard. Typically, you won't see any immediate indication that the screenshot was taken, but it is now ready to be pasted into an application.
How to Paste the Screenshot
To view and save the screenshot, you need to paste it into an application like Paint or Word. Here’s how:
- Open Paint:
- First, click on the Start menu, type "Paint" in the search bar, and press Enter to open the Paint application.
- Paste the Screenshot:
- Next, in Paint, press
Ctrl + Vto paste the screenshot from the clipboard. You should see the captured image appear in the Paint window.
- Next, in Paint, press
- Save the Screenshot:
- Finally, click on "File" in the top left corner, select "Save As," choose your desired file format (e.g., PNG, JPEG), name your file, and select a save location. Then, click "Save."
2. Using Windows + Print Screen
Automatically Save the Screenshot to the Screenshots Folder
For a more streamlined process, you can use the Windows + Print Screen key combination. Here’s how:
- Press Windows + Print Screen:
- Simultaneously press the Windows key and the Print Screen key (
Windows + PrtScn). Thereupon, your screen will briefly dim, indicating that the screenshot has been taken.
- Simultaneously press the Windows key and the Print Screen key (
- Locate the Saved Screenshot:
- Afterward, locate the saved screenshot. Unlike the simple PrtScn key method, this combination automatically saves the screenshot as an image file. Consequently, to find it, you must open File Explorer and navigate to "This PC > Pictures > Screenshots." Then, you’ll see your screenshot saved as a PNG file in this folder, automatically named with the date and time of capture.
Thus, by using these methods, capturing the entire screen on Windows 10 and 11 becomes a quick and straightforward task. So, whether you need to copy the screenshot to the clipboard for pasting into an application or save it directly as an image file, these built-in tools provide convenient options to suit your needs.
III. Taking Screenshots on Older Versions (Windows 7 and 8)
A. Entire Screen Capture
1. Using the Print Screen (PrtScn) Key
Similar to Windows 10 and 11
To begin with, the Print Screen (PrtScn) key works similarly in Windows 7 and 8 as it does in Windows 10 and 11. Pressing the PrtScn key captures the entire screen and copies it to the clipboard.
Pasting and Saving the Screenshot
Next, to save the screenshot, you need to paste it into an application such as Paint or Word. Here’s how:
- First, Open Paint:
- Click on the Start menu, type "Paint" in the search bar, and press Enter to open the Paint application.
- Next, Paste the Screenshot:
- In Paint, press
Ctrl + Vto paste the screenshot from the clipboard. The captured image will appear in the Paint window.
- In Paint, press
- Finally, Save the Screenshot:
- Click on "File" in the top left corner, select "Save As," choose your desired file format (e.g., PNG, JPEG), name your file, and select a save location. Click "Save" to store the screenshot.
B. Active Window Capture
1. Using Alt + Print Screen
Similar Method for Capturing the Active Window
To capture only the active window in Windows 7 and 8, you can use the Alt + PrtScn key combination. This method is similar to the one used in Windows 10 and 11.
Steps to Capture and Save the Active Window:
- Initially, Select the Active Window:
- Ensure the window you want to capture is active by clicking on it.
- Next, Press Alt + PrtScn:
- Press the
Alt + PrtScnkeys together to capture the active window. The screenshot is copied to the clipboard.
- Press the
- Lastly, Paste and Save the Screenshot:
- Open Paint or another image editor, paste the screenshot using
Ctrl + V, and save it as described in the previous section.
- Open Paint or another image editor, paste the screenshot using
C. Limited Area Capture
1. Using Snipping Tool
Available in Windows 7 and 8
The Snipping Tool is a built-in utility in Windows 7 and 8 that allows you to capture specific areas of your screen.
Types of Snips and Usage
The Snipping Tool offers several types of snips:
- Free-form Snip: Allows you to draw a free-form shape around the area you want to capture.
- Rectangular Snip: Lets you drag a rectangle around the area you want to capture.
- Window Snip: Captures a specific window that you select.
- Full-screen Snip: Captures the entire screen.
Follow These Steps to Take and Save a Snip
- Open the Snipping Tool:
- Click on the Start menu, type "Snipping Tool" in the search bar, and press Enter to open the tool.
- Select the Type of Snip:
- Click on "New" and select the desired snip type from the dropdown menu.
- Capture the Area:
- Use your mouse to capture the desired area based on the selected snip type.
- Annotate and Save the Snip:
- After capturing the snip, you can use the Snipping Tool’s annotation features to highlight or mark areas if needed. Click on "File," select "Save As," choose a file format, name your file, and save it to your preferred location.
By following these methods, you can easily take screenshots on older versions of Windows, ensuring you capture exactly what you need, whether it's the entire screen, an active window, or a specific area.
IV. Advanced Screenshot Techniques
A. Game Bar (Windows 10 and 11)
1. Using Windows + G to Open the Game Bar Method:
- Opening the Game Bar
- The Game Bar is a feature in Windows 10 and 11 designed for gamers but can be used by anyone to capture screenshots and record gameplay. To open the Game Bar, press
Windows + G. - When you press
Windows + G, the Game Bar overlay will appear on your screen, displaying various widgets for capturing screenshots, recording videos, and more.
- The Game Bar is a feature in Windows 10 and 11 designed for gamers but can be used by anyone to capture screenshots and record gameplay. To open the Game Bar, press
2. Capturing Screenshots During Gameplay
- Taking a Screenshot
- Within the Game Bar, you can take a screenshot by clicking the camera icon or pressing the default keyboard shortcut
Windows + Alt + PrtScn. The screenshot will be saved automatically to your Videos/Captures folder.
- Within the Game Bar, you can take a screenshot by clicking the camera icon or pressing the default keyboard shortcut
- Accessing and Managing Screenshots
- To find your screenshots, open File Explorer and navigate to "This PC > Videos > Captures." You can view, edit, and manage your screenshots from this folder.
B. Another Alternative is to Use the Command Prompt or PowerShell:
1. For Advanced Users: Taking Screenshots via Scripts:
- One Alternative is Taking Screenshots with the Command Prompt:
- Taking Screenshots with PowerShell
- PowerShell provides more flexibility for scripting screenshots. Here’s an example PowerShell script to capture the entire screen:
- Script:powershellCopy code
Add-Type -AssemblyName System.Windows.Forms Add-Type -AssemblyName System.Drawing $Screen = [System.Windows.Forms.SystemInformation]::VirtualScreen $Bitmap = New-Object System.Drawing.Bitmap $Screen.Width, $Screen.Height $Graphics = [System.Drawing.Graphics]::FromImage($Bitmap) $Graphics.CopyFromScreen($Screen.X, $Screen.Y, 0, 0, $Bitmap.Size) $FileName = "C:\Screenshots\Screenshot_" + (Get-Date -Format "yyyyMMdd_HHmmss") + ".png" $Bitmap.Save($FileName, [System.Drawing.Imaging.ImageFormat]::Png) $Graphics.Dispose() $Bitmap.Dispose() Write-Output "Screenshot saved to $FileName" - Save the script as a
.ps1file and run it in PowerShell. The script captures the entire screen and saves the screenshot as a PNG file in the specified location.
- Advanced users can take screenshots using the Command Prompt and built-in Windows tools like
snippingtool.exe. Here’s an example script to capture a full-screen snip: - Script:batCopy code
@echo off echo Taking a screenshot... snippingtool /clip pause - Save the script as a
.batfile and run it to capture a screenshot. The captured screenshot will be copied to the clipboard, which you can then paste into an image editor.
Hence, by using these advanced techniques, you can take your screenshot capabilities to the next level, whether you're capturing gameplay moments with the Game Bar or automating screenshots with Command Prompt and PowerShell scripts. These methods provide greater flexibility and control, especially useful for power users and those looking to streamline their workflow.
V. Common Issues and Troubleshooting
A. Print Screen Key Not Working
1. Potential Reasons and Fixes
Fn Key Lock
First and foremost, on some keyboards, especially laptops, the Print Screen (PrtScn) key might be shared with another function key (Fn key).
- Reason: This sharing can prevent the Print Screen key from functioning as expected.
- Fix: Try pressing the
Fn + PrtScnkey combination to see if it works. Additionally, some keyboards require the function key to be locked or unlocked, so try toggling the Fn lock by pressingFn + F LockorFn + Esc.
Keyboard Driver Issues
Furthermore, outdated or corrupted keyboard drivers can prevent the Print Screen key from working.
- Reason: Such issues with the keyboard drivers may interfere with key functionality.
- Fix: Update your keyboard drivers through the Device Manager. Open Device Manager, find your keyboard under the "Keyboards" section, right-click, and select "Update driver."
Software Conflicts
Moreover, some software or background applications might override the Print Screen key functionality.
- Reason: These software conflicts can disable the Print Screen function.
- Fix: Check if any software (e.g., OneDrive, Dropbox) is set to capture screenshots automatically. Disable this feature in the software settings if necessary.
Hardware Issues
Lastly, physical damage or a malfunctioning keyboard could be the cause.
- Reason: Hardware issues can prevent the key from working altogether.
- Fix: Test the Print Screen key on another computer to rule out hardware issues. If the key is faulty, consider using an external keyboard or an on-screen keyboard to capture screenshots.
B. Screenshots Not Saving
1. Checking Default Save Locations
Verify the Save Location
Firstly, screenshots might be saved in unexpected locations due to changes in default settings.
- Reason: This can happen if the default save path has been altered.
- Fix: For screenshots taken with
Windows + PrtScn, navigate to "This PC > Pictures > Screenshots" to find your saved images. If using the Snipping Tool or Snip & Sketch, check the default save location or manually save the screenshots to a known folder.
2. Ensuring Sufficient Storage Space
Verify Storage Availability
Additionally, screenshots may not save if there is insufficient storage space on your drive.
- Reason: Lack of storage space can prevent screenshots from being saved.
- Fix: Check your available storage by opening File Explorer, right-clicking on the drive where you save screenshots, and selecting "Properties." Ensure there is enough free space. If not, delete unnecessary files or move them to an external drive to free up space.
Adjust Save Settings
Moreover, default save settings might be misconfigured.
- Reason: Misconfigurations can lead to screenshots not being saved properly.
- Fix: In apps like OneDrive or Dropbox, check the settings to ensure they are configured to save screenshots to the desired location and that there is enough storage space available in your cloud storage accounts.
By addressing these common issues and following these troubleshooting steps, you can ensure a smoother and more reliable experience when taking and saving screenshots on your Windows device. Whether it's a hardware issue or a software conflict, these solutions will help you get back to capturing and saving your screen effortlessly.
VI. Most Difficult Screenshot Type
A. Limited Area Capture
1. Challenges with Precision in Free-form Snips
Irregular Shapes and Fine Details
First and foremost, capturing a free-form snip can be challenging because it involves drawing an irregular shape around the area you want to capture. Achieving precision, especially around fine details, can be difficult.
- Example: For instance, drawing around a complex diagram or an intricate piece of artwork may result in jagged edges or missed sections, making the screenshot less accurate.
Steady Hand Requirement
Additionally, a steady hand is required to draw a precise outline. Any slight movement can distort the shape, leading to inaccuracies in the captured area.
- Example: For example, capturing a specific part of a webpage or a detailed section of an image without including unwanted elements can be tricky.
2. Solutions and Tips for Accurate Captures
Using a Mouse or Stylus
One effective solution is to use a mouse or a stylus (if you have a touchscreen device) for better control and precision. A stylus, in particular, allows for more accurate drawing compared to a trackpad or a standard mouse.
- Tip: If you don't have a stylus, consider using a high-precision mouse to improve control.
Zooming In for Detail
Moreover, zooming in on the area you want to capture before taking the screenshot can make it easier to see and outline finer details accurately.
- Tip: Use the zoom feature in your application (e.g., browser, image editor) to enlarge the section you want to snip.
Using Rectangular Snip Instead
If precision is crucial and the area you need to capture can fit within a rectangle, consider using the rectangular snip option instead of the free-form snip. This method is easier to control and results in cleaner edges.
- Tip: Adjust the rectangle's size to match the area as closely as possible for an accurate capture.
Practice and Patience
Finally, practicing taking free-form snips can help improve your control and accuracy. Over time, you’ll get better at outlining the desired areas more precisely.
- Tip: Be patient and take your time when drawing the outline. Rushing can lead to mistakes and inaccuracies.
By addressing these challenges and implementing these solutions, you can significantly improve the accuracy and precision of your limited area captures. Whether using a stylus, zooming in, opting for rectangular snips, or simply practicing, these tips will help you achieve more accurate and professional-looking screenshots.
VII. Conclusion
Taking screenshots on Windows is a vital skill for effectively capturing and sharing information displayed on your screen. Throughout this guide, we've covered a variety of methods for taking screenshots on Windows, including both basic and advanced techniques. Here's a quick recap of the methods discussed:
Entire Screen Capture
First, using the Print Screen (PrtScn) key allows you to copy the screen to the clipboard and paste it into an image editor or document. Additionally, the Windows + Print Screen combination automatically saves the screenshot to the Screenshots folder, streamlining the process.
Active Window Capture
Moreover, you can use Alt + Print Screen to capture only the active window and paste it into an image editor or document. This method is particularly useful when you need to focus on a specific window.
Limited Area Capture
Furthermore, the Snipping Tool or Snip & Sketch enables you to capture specific areas of the screen. These tools offer various snip types, such as free-form, rectangular, window, and full-screen snips, providing flexibility depending on your needs.
Advanced Techniques
For more advanced tasks, you can utilize the Game Bar in Windows 10 and 11 for capturing screenshots during gameplay. Additionally, Command Prompt or PowerShell scripts can be employed for automated screenshot tasks, giving you greater control and customization options.
Common Issues and Troubleshooting
When encountering issues, solutions for the Print Screen key not working include checking for Fn key lock, updating keyboard drivers, and addressing software conflicts. Similarly, if screenshots are not saving correctly, you should verify default save locations and ensure sufficient storage space to resolve the problem.
Most Difficult Screenshot Type
Lastly, challenges with precision in free-form snips can be addressed by using a stylus, zooming in for detail, and practicing for better control. These tips help improve accuracy and make capturing specific areas more manageable.
In conclusion, we encourage you to practice these methods to find the one that best suits your needs. Whether you're capturing an entire screen, a specific window, or a precise area, each method has its advantages depending on the context.
We invite you to share your tips and experiences with taking screenshots on Windows. Your insights can help others enhance their screenshot-taking skills and discover new ways to use this essential tool. Feel free to leave a comment below with your favorite techniques or any additional tips you have found useful.
References:
- How to Take Screenshots on Windows 10 and 11
- Using the Snipping Tool and Snip & Sketch
- Game Bar Overview
- Command Prompt and PowerShell Scripts for Screenshots
By mastering these screenshot techniques, you'll be well-equipped to capture and share the information you need efficiently and effectively.